Sunday, January 5, 2014

Science Bottles and Free Printable

Here's a quick post about some of our Toddler Science Bottles.

A Science Bottle is a bottle containing a science experiment or phenomenon that can not be opened and is meant to be explored visually and otherwise.

Most people do these with individual sized plastic drink bottles.  I'm using plastic peanut butter jars.  That's for two reasons, one I like the conformity of the size and two, I'm tired of seeing kids slobber all over the caps of the bottles.  Even my preschoolers put that part of the bottle in their mouth (they often played with them in the Home Living area as play food bottles) and it's yucky.

The jars have other advantages over bottles too.  There's no ridges to obstruct view and the lid is large giving me space to place the label without covering up any of the contents.

My basic set is 6 jars of simple science including: Separation, Settle Down, Density, I Spy, Bubbles, and Magnetism.

Here's how we make each one:

Separation: 1/2 water tinted with blue food coloring, 1/2 vegetable oil

Settle Down: 1 small container of glitter glue, 1 tsp loose glitter, hot water to almost the top

Density: (river rock) 1/4 honey, (popcorn kernels)1/4 maple syrup, (plastic bead) 1/4 red tinted water, (bottle cap) 1/4 vegetable oil, (cork)

Colors and Shapes:  rice, many colored beads in various shapes and colors

Bubbles: 1/2 colored water and a generous squirt of dish soap

Magnetism: paperclips, snips of pipe cleaner, safety pins, various screws, nuts and bolts etc...

And here's how we use each one:

Separation: Tilt from side to side and remark how the colors stay separated.  Compare the motion it make to a wave. Shake it up, see how the blue water and yellow oil combine to make green.  Watch the colors separate, explain that water is denser than oil so it separates to the bottom while oil is less dense than water and moves to the top.

Settle Down:  Give the jar a good shake.  Now hold it or set it on the table and watch the glitter swirl and settle to the bottom.  Very relaxing.  Great for before bed or to "settle down" and calm your mind.  Shaking gets the aggresion out and watching it setttle helps children relax.  Try shaking the jar sideways and watch how the glitter swirls sideways before settling down.  Explain that the glitter falls to the bottom because it's heavier or denser than the water.

Density: Discuss the various items and colors of liquids in the bottle.  Discuss density and how denser liquids move to the bottom and less dense liquids move to the top.  Compare the density of the liquids compared to themselves. Point out the various object trapped between each layer.  Make statements about the density of the items compared to the liquids.  "The bead is less dense than maple syrup but denser than the water."  Compare the density of the objects compared to themselves.  Shake it up.  Watch the colors and objects separate.  Play "I Spy" with it and look for certain objects.  Ask the child to make statements on where an object is using preposition words (on, under, between...) or density words (less dense than, more dense than, but not as dense as...)


Colors and Shapes: Take a photo of the items in the bottle before it is assembled. 
Slowly rotate the bottle and note the items the child recognizes inside.  Ask them to find certain colors or shapes.  Ask them to try and find two of something.  Look at the photo of the items and try to find one particular item.  Great activity for nap time or to settle down with.  Practice saying or signing color and shape words.  Play "I Spy" with colors or shapes and have the child find them.


Bubbles: Shake the jar and watch how the bubbles fill up the container.  Explain that a bubble is a liquid ball filled with air.  Watch the bubbles pop.  Tilt the jar back and forth and notice how the bubbles stay on top.  Practice saying the word 'bubbles".  Point out other bubbles in the real word like when you wash dishes or your hands.

Magnetism: Take a photo of the items in the bottle before it is assembled.  Have a discussion about which type of things are magnetic.  Make predictions on which items the child thinks will react to the magnet.  Use a magnet wand or large horseshoe magnet on the side of the bottle..  Note which items reacted to the magnet.  Compare results to predictions and draw conclusions to why the child thinks each item acted as it did.  Try to grab only one particular item with the magnet and move it around.  Try to move an item from the bottom of the bottle to the top using the magnet.  Move the magnet away and watch the item drop.


Here's are the sets of labels I designed for the tops of the peanut butter jars.

Words Only 

Words and Images


You can place these on the sides of your bottles if you prefer.  I recommend printing them on sticker paper, waterproofing them with clear packing tape or clear contact paper and then cutting them out by hand or with a large hole punch.  Then adhere them to the jar lids or bottle sides.

I'm looking forward to adding more as the children grow!!


DIY $0 Play Kitchen

DIY play kitchen from cast off furniture!


I know there are thousands of these on the internet right now but this DIY play kitchen breaks the mold in two big ways:


1. It cost me $0.  That's right $0!  I used entirely things from home and an IKEA TV stand I found in the alley that morning when I was taking out the trash.  Seriously!


2. You can completely disassemble it!  I didn't want to make something that me Toddlers would love only to see it abandoned in a year or two when they out grew it.  Also, I liked the odd shape of it and thought it would lend itself nicely to a writing station, garden center, art desk or even a TV stand later.

Here's what I did:

First I cleaned that think up.  It had little peg for the plastic flap (that was missing) so I removed those.


Then I thought out my plan and assembled items.  I looked for baskets that fit the openings.  My Trader Joe's Nectarine box would have fit well too.


The oven rack is simply one of my Dollar Tree cookie cooling racks.


I knew I needed a sink.  I used a square baking pan.  I  needed a sink spigot and googled other DIY kitchens.  My goal was removable so I used a wooden letter J like I had seen others do.  The knobs posed a little problem.  At first I had spice jar lids but couldn't figure out how to attach them.  Then I remembered I had wooden coins from a game that would be perfect.


I also wanted burners.  I was thinking CD's but didn't have any old ones.  I went with Tupperware lids.


Remember how I said it could all be completely disassembled without ruining the TV stand?  I am blessed with a husband who works for 3M and brings home tons of products.  I mainly used two products to attache the elements: removable contact strips and hooks and Scotch sticky shapes.


I used tiny clips and contact strips to attach the oven rack.  Another strip for the sink faucet.  I laid the J down instead if standing it on its end like other people did because it was more secure that way.  It still looks super cute.I attached the sink pan, burners and sink knobs with double sided removable sticky shapes.


Now the fun part!  The props!  I wanted to focus on metal, wood and cloth items with some silicone thrown in there as well.  I had a wooden set of egg cups that make perfect little goblets.  I grabbed a metal spoon and one of the whisks from the hand-held blender.  I threw in a couple cloth napkins with napkin rings.


I had a Dollar Tree muffin tin and some silicone cupcake liners from Target that were perfect for the oven and added two silicone ice cube trays, also from Dollar Tree.


I had a wooden food cutting set originally from Melissa and Doug that I thrifted.  I put the cutting board next to the sink and added the food and knife to the props.


I also had a set of felt sushi that we're actually cat toys that my cats disliked.  (These were not meant for children so check them carefully for small or detachable parts before giving to children).  Thew in another 3M goodie, a microfiber cloth, for washing dishes and we're finished!


Done!  Did the whole thing at nap time and it turned out great!


The kids loved it and played with it a lot!


I'm looking forward to using the kitchen with various props and pieces to make many activities.  I'm thinking Hand Washing Practice, Bakery, Restaurant, Pet Groomers, Floral Boutique...the list goes on!

Here it is again as a science center:


 I'm confident that when they get bored of it, we'll find other uses for the TV stand.


What's New?

Hooray!  IKEA trip today!  I picked up some more washcloths, because you can never have too many when it comes to cleaning up after toddlers!  I also got a couple more plastic bibs for days when we have more than two kiddos here.  They pair perfectly with my homemade bandana bibs for the ones who are learning to drink from an open cup.

Here's a photo and similar tutorial for our bibs.  We used cheap white utility towels and bandanas from the men's department.  Both came from Walmart:


I also bought the LATT table and chair set for $20.  $20!!  Such a steal!


I have plans to pimp it out like this one.  I especially like how they rigged it with a roll of craft paper underneath!:


But for now I just set it up because I couldn't wait.  It's easy to reassemble so I can take it apart and stain it later.

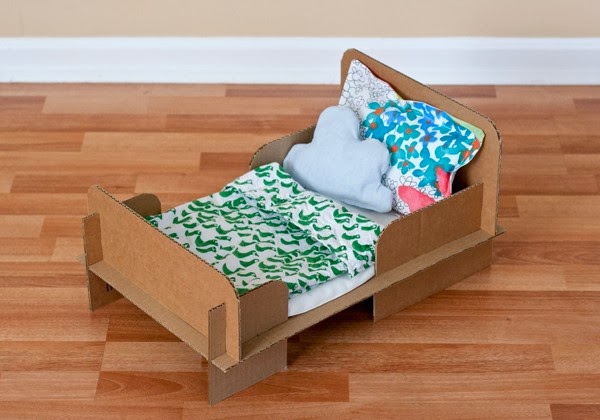
BONUS: I made this doll bed with the box it came in!


The kids are going to LOVE it!  Click the above photo for the tutorial with measurements.  I love that I can fold it flat when we get bored of it and can put it away for a while.  And if a piece of the bed gets smushed or bent, I can just trace and cut a new piece!

Tips:

  • Use a box cutter to cut the pieces.  Use a scissors to cut the slots and round the corners.  
  • For pieces you need to make two of, cut one and trace it instead of measuring a new one.  
  • Make two cuts really close to each other to make the slots and tear out the strip.
  • Use a coffe cup or glass to make the rounded corners.  Just trace the edge.

Click on the photo below for a tutorial for making a doll bed linen set from a recycled pillowcase: