Sunday, January 5, 2014

DIY $0 Play Kitchen

DIY play kitchen from cast off furniture!


I know there are thousands of these on the internet right now but this DIY play kitchen breaks the mold in two big ways:


1. It cost me $0.  That's right $0!  I used entirely things from home and an IKEA TV stand I found in the alley that morning when I was taking out the trash.  Seriously!


2. You can completely disassemble it!  I didn't want to make something that me Toddlers would love only to see it abandoned in a year or two when they out grew it.  Also, I liked the odd shape of it and thought it would lend itself nicely to a writing station, garden center, art desk or even a TV stand later.

Here's what I did:

First I cleaned that think up.  It had little peg for the plastic flap (that was missing) so I removed those.


Then I thought out my plan and assembled items.  I looked for baskets that fit the openings.  My Trader Joe's Nectarine box would have fit well too.


The oven rack is simply one of my Dollar Tree cookie cooling racks.


I knew I needed a sink.  I used a square baking pan.  I  needed a sink spigot and googled other DIY kitchens.  My goal was removable so I used a wooden letter J like I had seen others do.  The knobs posed a little problem.  At first I had spice jar lids but couldn't figure out how to attach them.  Then I remembered I had wooden coins from a game that would be perfect.


I also wanted burners.  I was thinking CD's but didn't have any old ones.  I went with Tupperware lids.


Remember how I said it could all be completely disassembled without ruining the TV stand?  I am blessed with a husband who works for 3M and brings home tons of products.  I mainly used two products to attache the elements: removable contact strips and hooks and Scotch sticky shapes.


I used tiny clips and contact strips to attach the oven rack.  Another strip for the sink faucet.  I laid the J down instead if standing it on its end like other people did because it was more secure that way.  It still looks super cute.I attached the sink pan, burners and sink knobs with double sided removable sticky shapes.


Now the fun part!  The props!  I wanted to focus on metal, wood and cloth items with some silicone thrown in there as well.  I had a wooden set of egg cups that make perfect little goblets.  I grabbed a metal spoon and one of the whisks from the hand-held blender.  I threw in a couple cloth napkins with napkin rings.


I had a Dollar Tree muffin tin and some silicone cupcake liners from Target that were perfect for the oven and added two silicone ice cube trays, also from Dollar Tree.


I had a wooden food cutting set originally from Melissa and Doug that I thrifted.  I put the cutting board next to the sink and added the food and knife to the props.


I also had a set of felt sushi that we're actually cat toys that my cats disliked.  (These were not meant for children so check them carefully for small or detachable parts before giving to children).  Thew in another 3M goodie, a microfiber cloth, for washing dishes and we're finished!


Done!  Did the whole thing at nap time and it turned out great!


The kids loved it and played with it a lot!


I'm looking forward to using the kitchen with various props and pieces to make many activities.  I'm thinking Hand Washing Practice, Bakery, Restaurant, Pet Groomers, Floral Boutique...the list goes on!

Here it is again as a science center:


 I'm confident that when they get bored of it, we'll find other uses for the TV stand.


What's New?

Hooray!  IKEA trip today!  I picked up some more washcloths, because you can never have too many when it comes to cleaning up after toddlers!  I also got a couple more plastic bibs for days when we have more than two kiddos here.  They pair perfectly with my homemade bandana bibs for the ones who are learning to drink from an open cup.

Here's a photo and similar tutorial for our bibs.  We used cheap white utility towels and bandanas from the men's department.  Both came from Walmart:


I also bought the LATT table and chair set for $20.  $20!!  Such a steal!


I have plans to pimp it out like this one.  I especially like how they rigged it with a roll of craft paper underneath!:


But for now I just set it up because I couldn't wait.  It's easy to reassemble so I can take it apart and stain it later.

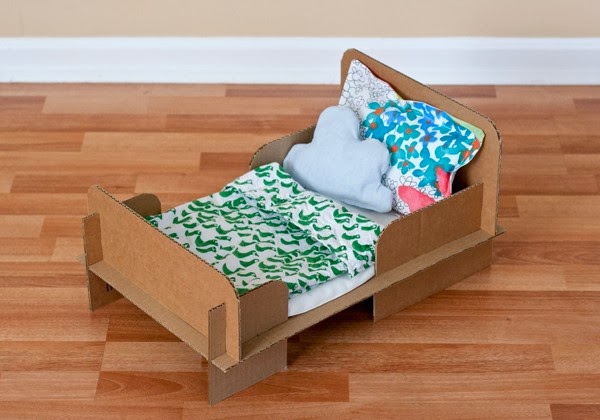
BONUS: I made this doll bed with the box it came in!


The kids are going to LOVE it!  Click the above photo for the tutorial with measurements.  I love that I can fold it flat when we get bored of it and can put it away for a while.  And if a piece of the bed gets smushed or bent, I can just trace and cut a new piece!

Tips:

  • Use a box cutter to cut the pieces.  Use a scissors to cut the slots and round the corners.  
  • For pieces you need to make two of, cut one and trace it instead of measuring a new one.  
  • Make two cuts really close to each other to make the slots and tear out the strip.
  • Use a coffe cup or glass to make the rounded corners.  Just trace the edge.

Click on the photo below for a tutorial for making a doll bed linen set from a recycled pillowcase:

Sunday, November 17, 2013

Baby/Toddler Safe Art Materials: Round-up

I love art, but have children in my class who mouth everything!  So this round-up of baby/toddler safe art materials is really just a go-to list for me.  I love the idea of making art supplies from scratch.  I want the children to be able to use the materials freely but they can be so expensive!  These recipes solve that problem and are safe to mouth.  While I wouldn't encourage the children to eat the materials, a small amount is perfectly safe if it gets in their mouth since all of the recipes below are made from food materials and non toxic household ingredients.  Click on the images below to go to the original posts for details.

 Baby's First Finger Paints


baby cereal, water, food coloring, muffin tin


Whip Cream Finger Paint


Whip Cream, food coloring, muffin tin
*Note: you can also just play with plain whip cream on the table and draw pictures in it with your fingers*

Sidewalk chalk paint


water, cornstarch, food coloring, muffin tin, sponge brushes

Homemade Safe Glitter


table salt, food coloring, cake-decorating silver dust


Homemade Watercolors


cornstarch, vinegar, corn syrup, food coloring, ice cube tray, soft paintbrush

Puffy Paint


flour, water, salt, food coloring, squeeze bottles

Microwavable Puffy Paint


self-rising flour, water, salt, q-tips, microwave

Baking Soda Clay "Model Magic"


baking soda, cornstarch, water, airtight container


Fruit Loop Sand Art


crushed fruit loops, cup, spoon

*Note, the author uses glue on paper, I recommend subbing a sheet of sticky contact paper.*
*Can also layer in small jars*

Dried Bean and Grain Collage Materials


dried beans, cornmeal, etc, contact paper, cardboard
*Note, the author uses glue on cardboad, I recommend subbing a sheet of sticky contact paper.*

Fizzy Fun

baking soda, vinegar, food coloring, tray with edge, pipette

*No Link: Drop vinegar tinted with food coloring onto a pan filled with baking soda. Sheer minutes of colorful fizziness!!" Looks like a lot of fun! Saving this one for a rainy day... (or a cranky one!)*


Homemade Playdough


flour, salt, water, vegetable oil, cream of tarter or alum, food coloring, saucepan, spoon

Edible Playdough


peanut butter, shortening, powdered milk, powdered sugar, airtight container

Beeswax Crayon Rocks

 beeswax, food coloring, grated soap


More Edible ‘Paint’ Recipes


1.     Pudding (chocolate, valnilla, pistacio, etc)

2.     Greek yogurt and food coloring

3.     Condensed milk and food coloring

4.     Edible Finger Paint:  2 cups of corn starch, 1 cup of cold water, 4.5 cups of boiling water, food coloring

5.     Jell-O Finger paint: First, select a variety of colors of jell-o from the grocery. Not sugar free.  Then, pour the powder into five separate containers and boiled some water in the microwave. Add the water slowly until you get a paste that is easily spreadable with your fingers. After the paints cool, they are ready to use! Simple as that!
 

More Playdough Recipes


1. Peanut Butter Play Dough:Combine- 1 cup peanut butter
- 1/2 cup honey
- 2 cups powdered sugar 2. Scented Kool-Aid Play Dough:Ingredients- 1/2 cup salt
-1 cup water
-2 tsp cream of tartar
-1 cup flour
-2 tsp vegetable oil
-1 packet flavored drink mix (Kool-Aid)Directions: In a medium sauce pan, mix all ingredients together.
 Stir over medium-low heat until it begins to thicken.
 When you start to see mostly dry spots and the mixture pulls away from the pan, turn off heat.
 Allow to cool, knead, and enjoy!


Thursday, October 3, 2013

How to Diaper a Standing Child


This is an old trick that center Preschool Teacher's are great at:  How to diaper a child who is standing up!

Why would you want to do that?  Trust me, when you get to the potty training stage and are encouraging your Toddler to try to go to the potty every 20 min, you'll appreciate this very much!

*Note* I do not recommend this for dirty diapers.  Only wet.  I just don't think that you can really get a child clean when they are dirty without having them lie down.  That said, it can be done.  Just ask your child to put their hands on the ground.  Looks a little strange to see a half naked Toddler doing the Downward Facing Dog in the bathroom, but it works.  And hey!  You never know when you'll be out and about and you realize you forgot the changing mat or the store you're at doesn't have a baby changing station, or your child is too heavy to lift up to a changing station or table.  (Very helpful for children who potty train later in life or preschoolers who have the dreaded b.m. accident after potty training.)

It may sound easy, but with squirmy Toddlers, it may be tricky to get the fit just right.  So I broke it down into these 7 easy steps:

How to Diaper a Standing Child
  1. Wipe- Have the child stand at the toilet facing away from you.  Wipe with a wet wipe through the legs from front to back.  Dry with a dry wipe or toilet paper if desired.
  2. Position Diaper- Open up the diaper all the way and thread through their legs.
  3. Attach Side Closures- Facing you or away (whichever is easier for you) attach one side closure.  Note how the diaper tabs fall on your child when the diaper tabs are closed and try to aim for positioning the first tab there.  If you're off, it doesn't matter, we'll adjust later.  Now attach the second side.  Go ahead and do it right over their shirt.  We'll adjust that later and it will be much easier for you to see what you're doing.
  4. Readjust Tabs- Important!  This is how the diaper gets the most comfortable for the child and the least likely to leak.  You will notice that the second tab you closed looks nicer and lies flatter than the first.  That's because you were able to pull on the first closed side and use both hands to do the second tab.  The first one probably looks all bunched up or crooked.  Now open up the first tab and re close it. Much better!  You can readjust the second tab too if you want to.
  5. Pull Out Bottom-  With the child facing away from you use your pointer fingers to pull out the edges of the seat of the diaper to properly cover their bottom.
  6. Pull Up in Back-  Now to reduce sag and leaks, pull up on the back waistband of the diaper.
  7. Untuck Shirt-  Now untuck their shirt and pull up their pants
That's it!  You're Done!


I know that may sound complicated but it really only takes a minute.  And you get faster with practice.

Happy Potty Training!


Thursday, July 11, 2013

21 New Ways To Play with Animal Figures


I'm always looking for new ways to extend the materials we already have instead of buying new things for the children, but when I saw these Animal Figures at the Dollar Tree, I knew I couldn't pass them up!


Though they are not the best quality (the seams are evident and the painting is basic) they have a few qualities I was looking for: They are realistic in color and design, they are large enough to leave on the shelf and still be safe for babies and toddlers (most Montessori animals ate the Toob kind and are very small), and they are varied in types of animals represented (sea creatures, amphibians, mammals from different parts of the world).


I also thought they would combine nicely with other animals I found at the Dollar Tree like horses, dinosaurs and snakes.


So now that we have these great animals, here's how we can play with them using items we already have or free printables:


  • Use them in the sensory table:
    • Make an Ocean with blue tinted water and islands or icebergs from cutouts of craft foam
    • Make a Farm with fences, a barn, hay, grass clippings, beans, mud or wood shavings
    • Make an Arctic landscape with white playdough, cotton balls, snow, white craft foam cutouts, or snowflake confetti

  • Add them to your continent baskets or boxes

  • Use them with playdough or a sand tray to make footprints

  • Match them to image cards


  • Sort them into an of the categories listed in my Animal Puzzle Blog Post
  • Use them to discuss animal sounds
  • Add them to the block area for creative play
  • Take them outside or to the park
  • Use them to act out animal stories
  • Use them as props in dioramas of countries or habitats
  • Make bookends from them (not really learning but visually inspiring)


I'd love to hear what you do with your animals!